How to Get Salon-Quality Hair Color at Home
Are you tired of shelling out big bucks at the salon every time you want to refresh your hair color? Well, you're in luck! Getting salon-quality hair color at home is doable. With the right tools, products, and a little know-how, you can achieve stunning results without breaking the bank.
In this guide, we're going to walk you through the steps to achieve that professional look in the comfort of your bathroom.
1. Choose the Right Hair Color
Selecting the perfect hair color is the essential starting point for your at-home hair coloring journey. To pick the best option, consider your skin tone and natural hair color. If you're uncertain which shade suits you best, check the color chart on the box of your chosen hair dye.
Many brands provide suggestions tailored to your hair color and the desired outcome. Take your time with this step, as it sets the foundation for your salon-quality look.
2. Gather Your Supplies
Before diving into the coloring process, ensure you have all the necessary supplies. Your hair dye kit should contain everything you need, including colorant, developer, gloves, and instructions. Additionally, have an old t-shirt or a designated hair coloring cape to protect your clothing.
Hair clips, a plastic or glass bowl, a hairbrush or comb, petroleum jelly, and a timer are all essential tools for a smooth DIY hair coloring experience. If possible, having a friend to assist can be a tremendous help, especially in hard-to-reach areas.
3. Protect Your Skin
To avoid unsightly color stains on your skin, take the time to protect it before applying the dye. Spread a small amount of Vaseline on your hairline, ears, and the back of your neck. This acts as a protective barrier, making wiping any accidental spills easy. A little extra care here goes a long way in ensuring a clean, professional finish.
4. Prepare Your Work Area
Creating an organized and clean workspace is crucial for a successful at-home coloring experience. Find a well-lit area with a flat surface where you can comfortably work. Lay down old newspapers or a plastic sheet to catch potential drips or spills. This simple step prevents any unintentional mess and preserves the condition of your bathroom or chosen coloring space.
5. Section Your Hair
To ensure your hair is evenly covered, split it into smaller sections. Begin by dividing your hair in the middle, then split each half into two sections. Use hair clips to secure these sections, allowing you to work on one portion at a time. This method simplifies the process and helps achieve consistent results throughout your hair.
6. Follow the Instructions
Following the instructions provided with your chosen hair dye is paramount for achieving salon-quality results at home. These instructions are specifically tailored to your product, ensuring the best outcome.
Pay close attention to the mixing ratio, application time, and any additional steps or precautions. Skipping or rushing through this step can lead to unexpected color variations or even damage to your hair. Take your time to understand the process thoroughly.
7. Apply the Dye
The exciting part is here - putting the dye on your hair. Begin at the roots and go down to the ends, ensuring all the hair gets completely covered. Use a hairbrush or comb to distribute the dye evenly and avoid clumps or uneven color patches.
Take your time and patience during this step, as it greatly influences the final result. Careful and precise application will help you achieve that seamless, salon-quality finish.
8. Set a Timer
After applying the dye, make sure to set a timer as per the instructions on the box. The recommended processing time ensures the color develops correctly and consistently across your hair.
Don't keep the dye on longer than the instructions, as it can harm your hair. Conversely, don't shorten the processing time, as it may lead to uneven or inadequate color coverage.
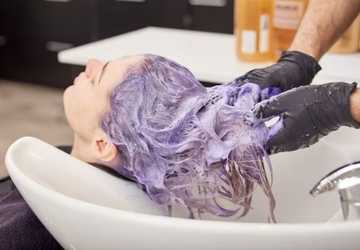
9. Rinse and Condition
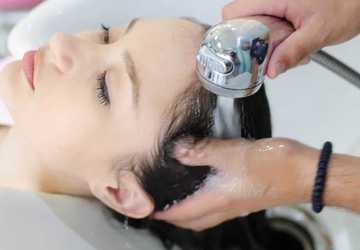
Once the timer beeps to finish the process, start washing out the dye. Use lukewarm water to gently rinse your hair until the water looks clean. This removes extra dye and stops the coloring.
After rinsing, use the conditioner included in the kit. Follow the instructions for how long to leave it on. Conditioning is crucial to keep your hair healthy, avoid damage, and make it look and feel great.
10. Style as Usual
With your newly colored hair now treated and conditioned, you can style it as usual. Whether you prefer to blow-dry, straighten, or curl, the choice is yours. Enjoy the freedom of confidently showcasing your salon-quality results, knowing you've successfully achieved the look you desired in the comfort of your home.
Maintaining Vibrant Color Over Time
Achieving salon-quality color is only half the battle; maintaining it is equally crucial. Here's how to ensure your vibrant color lasts longer:
Use Color-Protecting Products: Continue using color-safe shampoo and conditioner to extend the life of your color.
Reduce Heat Styling: Let your hair air dry whenever possible, or use the lowest heat setting on styling tools. Heat can accelerate color fading.
Avoid Chlorine and Saltwater: If you're a swimmer, consider wearing a swim cap to shield your hair from chlorine in pools or saltwater in the ocean.
Retouch Roots as Needed: As your hair grows, periodically touch your roots to maintain a consistent color. Follow the same application process as your initial coloring, but only apply dye to the roots.
Minimize Sun Exposure: Prolonged exposure can lead to color fading. UV rays can break down the hair's pigment, causing your color to become dull or brassy. To protect your locks, consider wearing a wide-brimmed hat.
Conclusion
Achieving salon-quality hair color at home is entirely within reach. With the right preparation, tools, and products, you can save time and money while looking fabulous. Remember to follow the instructions carefully, maintain your color, and enjoy your stunning DIY salon look!
Researching and choosing the best hair color products for your specific needs, as well as consulting online tutorials or seeking advice from professionals, can further enhance your at-home coloring experience.
RELATED ARTICLES

How to Learn Basic Astronomy and Stargazing
10 Proven Strategies for Selecting the Perfect Foundation for Your Skin Type

Top 10 Tips for Embracing Slow Living